Knit first hat - instructions and tips on size

- Notes on size
- Material for the first hat
- Knit first hat
- template
- Part 1
- Part 2
- The corner
No matter when a baby is born - in summer and winter it is well equipped with a baby hat. Outside Mama's stomach, thermoregulation still makes it difficult. As a Erstlingmütze keeps the head nice and warm or protects against too much sun. It is also a nice protection for the delicate skullcap.
It is not for nothing that among expectant mothers, at the latest in maternity protection, it is a popular activity to knit a first hat and other baby things. Color and pattern can be selected and the size individually adjusted. However, it is not clear before birth how big the baby and his head will be. Therefore, in this guide, we give you a few orders of magnitude to guide you in knitting a first-time hat. Our patented baby hat is particularly soft and stretchy. This makes it ideal for the colder days of the year and the fast-growing baby head.
Notes on size
When knitting a cap, two dimensions are essential: the circumference of the head and the height of the cap. The circumference refers to the thickest part of the head, which is measured over the ears. With this size you start your first hat on cuffs. The height ranges with the flat cap from the lower edge to the top. Depending on the shape of the head, the height can vary. A cuff to turn around gives a certain leeway here.
For the dimensions of the baby cap the following rules of thumb apply:
| Older | head circumference | Height of the cap |
| Preemies | 35 cm | 12 cm |
| 1st month of life | 36 cm to 38 cm | 12.5 cm |
| 2nd - 4th month of life | 39 cm to 41 cm | 13.5 cm |
| 5-7 months of age | 42 cm to 44 cm | 15 cm |
| 8th - 12th month of life | 45 cm to 48 cm | 16 cm |
If you have the opportunity, it is of course always better to take the measurements directly on the baby. Always keep in mind that knitted clothing is stretchy. Especially the first hat from this manual has the potential to grow for several months.
Material for the first hat
- approx. 15 g pink and 15 g white merino wool, running length 160 m / 50 g
- Nadelspiel size 3
- 1 woolen needle

The material information refers to a Erstlingsmütze for a newborn. A baby cap needs very little wool and is ready knitted. Therefore, it is also a nice project to use Wollreste.
Prior knowledge:
- right stitches
- left stitches
- envelope
- lift off left
- Remove stitches
Knit first hat
template
The two-tone patent pattern in rounds
The full patent in rounds does not differ much from the patent pattern in rows. The only difference is that in every second row, the stitches are knitted with the envelope on the left. So there are two pattern rounds. The first one follows the scheme: knit 1 stitch with the right side of the change and take off 1 stitch with the left side of the envelope. The second round is: 1 sts with the envelope on the left, knit 1 st in the left side of the envelope.
The rounds always end with the same stitch that starts the next round. If the round ends with a stitch on the left with an envelope, then the first stitch of the following round is also lifted off to the left with an envelope. This duplication is not noticeable later in the pattern.

In the two-tone patent, it is now the case that you knit the two pattern rounds in different colors. The main color is used in the round with the right stitches, the background color in the round with the left stitches. In our case the main color was pink and the background color was white.
Tip: The baby hat can also be worn on the left. Here then dominates the background color.
Part 1
Once you have determined the size of your baby cap, make a stitch as usual. Knit the stitch sample in the full patent. This results in the required number of stitches for the stop. In our case, the 10 cm x 10 cm mesh sample returned a good 27 stitches and 70 rows. Based on the size of a first hat of 35 cm circumference and 12 cm height, this resulted in 96 stitches and 84 rounds.
In your main color, strike the calculated number of stitches. Always round to an even number of stitches. Choose a loose stitch, for example with two knitting needles.
The first rounds are only knitted in the main color. In the first round after the attack start with a right-hand stitch. The following stitches are alternately lifted off left with turn-up and knitted on the right.

The round ends with a stitch that you lift off with an envelope. So starts the second round. Now just follow the pattern series of the full patent in rounds. This means for this round you take turns one stitch on the left with an envelope and knit a stitch with the envelope on the left.
Note: A common mistake with the full patent is that the stitching with the envelope is not lifted off to the left, but accidentally knitted on the left!
Knit 3 cm or 21 rounds in a monochrome full patent. The last round should be the pattern round in which the stitches with the envelope are knitted together on the right.

Now take the second color. Knitting the next round in the background color. In this round the stitches are knitted together with the envelope on the left.

From now on, change the color after each round. Cross the two threads at the transition to the next round, so that no hole is created. For this, lay the thread of the preliminary round over the thread of the new round, before you knit the first stitch. Make sure that the stationary thread always stays on the back of the work.

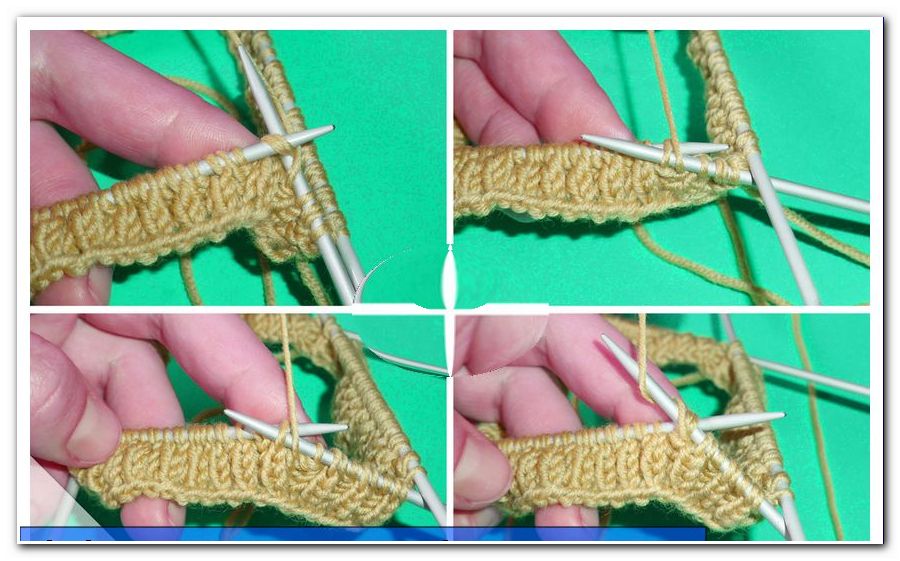
Part 2
In the second part, stitches are taken regularly. For the full-color two-color patent, it is best for the pattern if only every 4th round is taken in the same place. In addition, always remove 2 stitches at a time to obtain the ribbed pattern. The goal is to have only 8 stitches on the needles at the end. As a result, you need to take 96-8 = 88 stitches. Since 4 stitches are taken per pick-up lesson, you will need a total of 22 pick-up times. Because only every 2nd round is taken, you must knit 44 rounds to reduce from 96 to 8 stitches. With 84 laps in total, you start with the declines after the 40th round.
You take 4 stitches every 2 rounds. Pickup point is on all 4 needles after each of the first two stitches. (NOT in the center of the photo as in the picture!). Mark these spots in two different colors. The first and the third needle are given the same marking color and the second and the fourth needle.

You take two stitches at once by knitting three stitches to the right. It is always a stitched envelope, a single stitch and another stitched loop. It's a bit difficult at first to knit together so many stitches. In case of doubt, first pierce through all the stitches as for the left knitting. So they relax a little. Now take 2 stitches on the 1st and 3rd needle in the 1st round. This is followed by a normal pattern round. In the second round of sampling, remove 2 stitches on the 2nd and 4th needle according to the marking. This is always going on and on until you only have 8 stitches on the needles.

Tip: Since the declines are a bit tricky and lost stitches in the patent are difficult to resume, it is worth a backup line. To do this, use the wool needle to thread a thread through all the stitches on the needles. Tie the protruding ends together. At this point, you can always easily start with problems.

The corner
You can knit the top at will and to the size of your first hat. Continue knitting with the 8 stitches until it is enough for you. We worked the corner over 8 laps.
On the last round, knit 2 stitches (one simple and one with an envelope) to the right.

Cut the threads and pull both colors through the remaining 4 stitches using the wool needle. Prick on the inside of the cap and sew the threads there.
Note: Be aware of invisible stitching if you also want to use the baby hat from the left side.
Now your first hat is finished with Zipfel!


