Crochet Snood - Free instructions for a crocheted hairnet

- Crochet snood
- Material and preparation
- Crochet Snood | Variant I
- Crochet Snood | Variant II
Nothing goes better with the vintage look than a self-crocheted hairnet - also called snood. Vintage fashion offers its lovers the opportunity to realize their beloved clothing from the past decades. Individuality and freedom are stylishly presented with a snood or a hair net.
The vintage look, which has been rekindled for years, is dedicated to the free creative lifestyle. A crocheted hairnet fits into all fashion epochs of yesteryear. Whether comfortable or elegant, whether cheeky or wild, crocheting a snood and wearing the casual fashion of bygone days, this is the perfect outfit to make yourself happy. The yarn determines the look.
Crochet snood
Our crocheted hairnet is the perfect base to create a quick and easy vintage hairstyle. A snood not only holds the hair together well, it also shows fashion chic at any time of the day. To crochet a snood, you do not have to be a crochet artist. We have again put together a guide that can work well every crochet beginner well.

You can vary without limits. We present you the basic version and crochet your very own hairnet. This applies to the size as well as the pattern.

Material and preparation
Which yarn can be used ">
Who wants to dress his hair in a chic outfit for the evening wear, can also crochet the Snood with a lurex yarn. The snood looks just as elegant when it comes with the crochet yarn an effective Beilaufgarn. In both cases, shine and glitter get into the hair.
One way is also to crochet the hairnet with a thin ribbon yarn. And if you want to give the Snood a very special touch, you work into the hairnet with small beads.
To crochet material consumption for a snood
For a crocheted hair net that was worked for a head circumference of 50 cm, we have processed 50 g / run 120 m cotton yarn.
- Snood I was 3.5 mm with a crochet hook
- Snood II was crocheted with a 3.0 mm crochet hook

Crochet basic pattern Snood
The basic pattern of the Snood consists of the following types of mesh.
- stitches
- strong stitches
- Kettmaschen and the
- thread ring
If you can crochet these stitches, it will be easy for you to crochet a hair net. If you are no longer sure how to crochet a thread ring or a chain stitch, for example, you will find an exact guide to all stitches in our crochet overview.
Crochet Snood | Variant I
The crocheted hairnet is worked in both models from the center out. Thus, always crocheted in circles and thus in rounds. The middle becomes an eye-catcher. In the first Snood we kept this center simple, at Snood II we worked in a Granny Square pattern .

Both hairnets go into a net in round 6; From this round, both models will continue to work the same way. You can also set the size of the Snood yourself. We will tell you in the manual when you can customize the size. For this you should measure your head circumference . That is, measure the roundness from the neck to the crown.
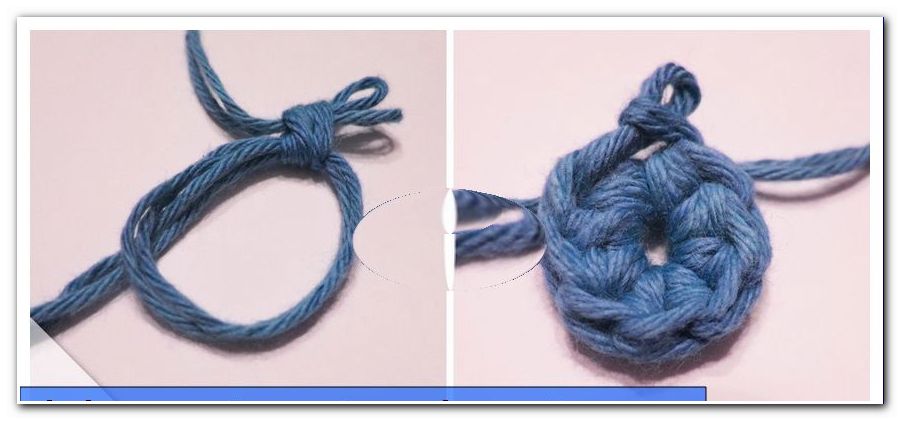
We start each snood with one:
- thread ring
1 round:
- 4 + 2 mesh = 6 luma = 1 double + 2 luma
- 1 double stick
- 2 air meshes
- 1 double stick
- 2 air meshes
For this round you have to crochet 12 double sticks and therefore 12 luma-tunnels.
The round ends with:
- 2 air meshes

- 1 sliver in the 4th air mesh of the 1st double stick

2nd round:
- 4 + 2 air mesh = 6 luma, 4 for the 1st double stick and 2 for the space
- in the same puncture of these first air meshes
- Crochet 1 double swab in addition

- 2 air meshes
- in the following double stick of the preliminary round

- 1 double stick
- 2 air meshes
- 1 double stick
- 2 air meshes
So crochet the whole round finished. Finish the round with 2 air stitches and one slit stitch in the 4th luma of the first double stick .

3rd round:
To get into the right working position crochet as follows.
- 1 sliver stitch in the following stitch of the preliminary round
- Put 1 tight loop in the tunnel
- 8 air meshes
- Work 1 tight loop in the next tunnel

- 8 air meshes
- Crochet 1 sturdy stitch in the next tunnel

Crochet the whole round in this order . The round ends with a chain stitch in the first fixed loop of the preliminary round.
4th round:
In order for the right working position to be achieved again, ...
- 3 Kettmaschen are crocheted high in the chain of airmesh

- into the 4th air mesh of this chain
- Crochet 1 tight stitch
- 9 air meshes

- Work 1 tight loop in the next tunnel
- 9 air meshes

Crochet the entire round in this order. The round ends with a chain stitch in the first fixed loop of the preliminary round.
5th round:
In this and in all following rounds, 4 chain stitches are always worked up in the air machine tunnel. After that, in the middle of the tunnel ...
- 1 fixed loop
- Crocheted 9 airmeshes

The round begins and ends the same as round 4.
6th round - 13th round:
Now all the upcoming rounds are worked like round 5.
- Work 4 chain stitches up the air stitches
- 1 fixed loop
- 9 air meshes

- 1 fixed loop
- 9 air meshes 1 fixed mesh etc.

After the 13th round you can now choose the size of the snood yourself. If you have thick hair or a lot of hair adorns your head, you may want to consider adding another round, like the 13th round.
It is important that the following rounds are worked so that the edge is well around the head. The edge should not be too narrow, but not too far. Therefore, you need to balance your measured head circumference with the circumference of the mesh. In other words, work your way slowly to the head circumference. You can still crochet the bundle more tightly. Do not expand.
14th round:
As in the last rounds before,
- Crochet 4 slivers, then
- 1 fixed loop
- 4 air meshes
In the next tunnel ...
- 1 fixed loop
- 4 air meshes
Continue the entire round in this episode. The round ends with a chain stitch in the first fixed loop of the preliminary round.
After this round, you can try the Snood before it even fits. However, you have to remember when fitting that the finished crocheted waistband will make the whole cuff work even tighter. If the hairnet is still too wide for you, separate this round again and crochet instead of 4 air stitches only 3 air stitches and 1 tight stitch. However, if the hairnet is too tight for you, simply extend the meshes from 4 luma to 5 meshes.
15th round:
In every tunnel of this round ...
- Crochet 4 strong stitches

The round ends with a tight stitch in the 1st tight stitch at the beginning of the round. Also in this round you can correct the circumference of your hairnet by the number of fixed stitches. You can expand the circumference by crocheting 5 sturdy stitches into the tunnel instead of 4 sturdy stitches. If you want the cuffs to be even tighter, crochet 3 sts in a tunnel instead of 4 sts.
16th round:
- 1 climbing air mesh
- in every stitch of the preliminary round
- Crochet 1 tight stitch

17th round to the desired width of the net ...
- Only right-hand stitches work
At the end, crochet 2 slivers in the last two stitches. The thread cut off and sewn inside. This also applies to the starting thread in the thread ring. Our booklet "Snood crochet" is 3 cm wide.

Crochet Snood | Variant II
With our snood crochet II we bring a little variety into the hairnet. In our example, we show you a possible Granny Square, which you can use as the center of a crocheted hairnet.

This is just a suggestion. You can theoretically apply all Granny Squares here. Your imagination is the limit. We will show you our suggestion for this snood until the round, from where you continue to work as Snood I crochet.
- thread ring
1 round:
- in the thread ring
- 3 air mesh = the 1st stick
- 15 sticks
- in the thread ring are thus 16 sticks
Finish the round with a slit stitch in the 3rd starting air stitch.

2nd round:
- 1 air mesh = climbing air mesh
- in the following chopsticks work 1 fixed stitches
- 4 air meshes
- Skip 1 stick
- Crochet 1 crochet stitch into the next piece
The round ends with 4 air stitches and 1 sliver stitch in the 1st tight stitch.

3rd round:
The chain of mesh along ...
- Crochet 2 slips to the 2nd round of the preliminary round
- 3 air meshes
- Work 6 sticks in this 2nd air mesh

- Crochet 7 sticks into the 2nd air stitch of the next bow

Crochet the entire round in this episode. The round ends with a chain stitch in the 3rd air mesh of the three initial air meshes.
4th round:
The new group of sticks is always worked between the two groups of sticks of the preliminary round.
- 3 air mesh = the 1st stick
- 6 sticks

- 1 fixed loop
- in the 4th stick of the preliminary round

- Crochet 7 sticks into the stick group of the preliminary round

Finish the entire round in this order. Close the round with a chain stitch in the 3rd mesh of the first loop .

5th round:
Work 2 slivers to the middle of the stick group.
- 1 stick
- 1 air mesh
- Skip 1 stitch
- 1 stick
- 1 air mesh
- Skip 1 stitch

Continue until the end of the round. Close the round with a slit stitch in the first stick.
6th round:
From this round, the hairnet will be crocheted just as crochet with the Snood I. This applies to all subsequent rounds.