Embroidery: The Cross Stitch - Instructions and Examples

- Material and preparation
- Material procurement and costs
- Instructions for the cross-stitch
- Customize embroidery projects
Shabby Chic belongs to the perfect country house style. But the furnishings only look complete when embroidered accessories here and there complete the appearance of an old room. For reasons of cost, many country-house fans abstain from rounding off their furnishing concept with embroidered doilies, and their production is easier in handwork than many have thought. For in the beginning it is sufficient to use the simple cross-stitch.
Shabby chic and country house style are in fashion. Interior decorators like to use embroidered doilies to complete the look and make the room feel homelier. In trade, however, such tablecloths usually cost a lot of money. It is much cheaper to embroider such accessories yourself. But what materials are needed and how exactly do you embroider "> Material and preparation
You need this:

- sewing needle
- yarn
- Embroidery ground (fabric for embroidery)
- hoop
- Thimble or tape
- scissors
If you are embroidering for the first time, you should get sewing needles in different sizes and try out which needle he / she can handle best. For the beginning, a larger needle is recommended because it can be better grasped. The smaller needles are usually used for more demanding stitches. You should also pay attention to the size of the eye of the needle. If you do not have any practice in threading, you should choose a bigger one.
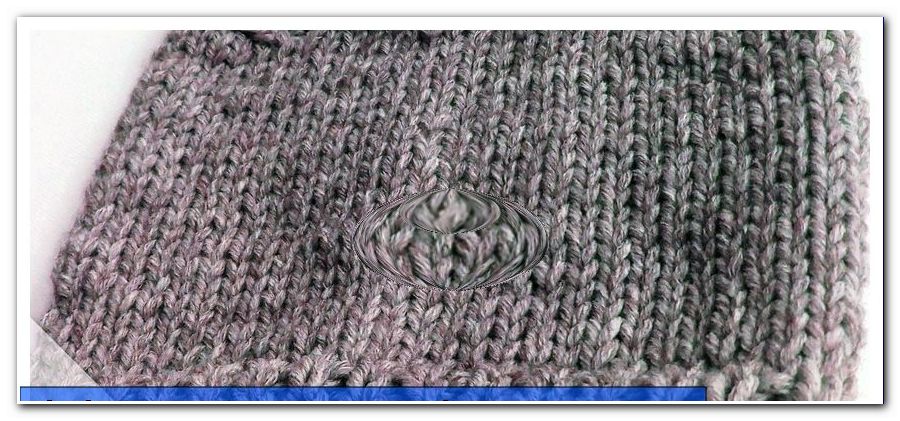
In the first tests, the quality of yarn and fabric does not play a major role. When choosing the yarn, grab what you like and within your budget. Make sure, however, that the needle, yarn and embroidery base match each other in color and strength. In addition, you should choose for your first stick exercises a substance whose "pores" are clearly visible.

One speaks of such substances of "counting fabric", because the distances can be counted in a very simple way. Linen is best, but it is quite expensive. If in doubt, ask in a haberdashery or fabric shop specifically for a favorable embroidery ground.
If you do not want to invest a lot of money in the new hobby at the beginning, you can do without an embroidery hoop during the first attempts and stretch the fabric with your left hand. Tightening is necessary to prevent the embroidery from warping or fabric bulging. An embroidery hoop, however, is not too expensive and a huge help especially for larger projects.
Do yourself a favor and use a thimble for the first few tries or tie tape around your left thumb and forefinger. Unfortunately, stitches can not be avoided at the beginning, but the following pains are. The rumor that forms after the first stitches to protect cornea on the fingers, is a nurse's tale.
To cut and cut the yarn is a completely simple, usual household scissors. Although there are special thread scissors that beginners do not yet need.
All materials (except for the tape) are available in haberdashery stores. There are also funny sets (mostly made of fabric, yarn and needle) for beginners. Just take a look around there and let yourself be inspired!
Material procurement and costs
Basically, the same applies to haberdashery as, for example, for electronics or books: in online trading, they are usually cheaper. If you have found a trustworthy dealer and the quality of the offer meets your expectations, nothing speaks against it, if you get the embroidery base and the yarn from there. But be careful when buying the needles! Cheap offers on the internet can therefore stem from the fact that the needles were made of inferior material. If they are stressed too much - which can happen more often, especially in the first attempts - they break in half. This is not only annoying, it also involves a certain risk of injury. After all, it is a pointed metallic object. Therefore, when buying embroidery needles, attention should definitely be paid to quality and in case of doubt in the specialist shop personally inquire. But even there, a range of 3-5 embroidery needles should not cost more than 5 euros.

When purchasing the embroidery hoop, you are faced with the question: plastic or wood ">
Tip: Even haberdashery, including mainly embroidery ground, are mostly seasonal goods. This means that at the end of a season, stores take the leftover products off the shelves and offer them on special items at a reduced price to make room for the new season's merchandise. Anyone who keeps their eyes open during these times and shows some patience can make one or two bargains.
Instructions for the cross-stitch
1. Clamp the embroidery base in the hoop. Take apart the two parts of the frame. Then place the fabric on the inside of the frame with the side of the fabric (the side of the fabric on which you want to see the motif) and stretch the larger one over it.

If the fabric does not sit tight enough in the frame, release it again. Turn the screw of the upper part to the right to make it narrower and try again. This approach takes some practice, but after a few tries, you get the hang of it.
2. Prepare the sewing thread. Find the yarn you want to start with and cut it at arm's length. Depending on the quality of the yarn, the fabric, the type of motif and the size of the needle, you may need to divide the yarn. If you find that the yarn you are buying does not fit through the pores of the fabric, you should halve the yarn.

But you can also use this technique to influence the optical effect of the embroidery image. Advanced work with motivic parts, which are to sting in the eye, with thicker yarn. For sections in the embroidery design, which are more filigree and should look like this, they only use half the yarn. Try it out!
3. Now thread the prepared yarn into the eye of the needle. For that you need a little patience at the beginning. But you will soon realize that it is always easier for you. Tie the yarn around the needle. Grasp them with the thumb and forefinger of the left hand and then pull the needle out with your right hand. Pass the loop of the thread through the eye of the needle.

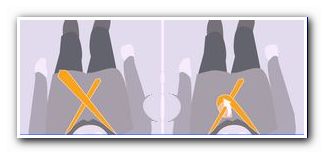
4. Now look at the fabric that you have stretched into the frame. Recognize that the pores are parallel on all sides "> 
6. Insert the needle into the upper right corner of the square and insert the needle tip over the back of the fabric into the upper left corner of the square. Put the needle on the corresponding pore and push it a little so that the tip of the needle is visible in front again.

Now grab the front piece of the needle and pull on it until the yarn lays on the fabric. But be careful: if you pull too hard or too fast, you could pull the entire thread through the fabric. That can happen in the beginning. Do not worry: practice makes perfect! Repeat steps 4 to 6 if necessary.
 7. Half of the cross stitch is already done. To complete it, pierce the needle into the pore that forms the lower right corner of the square and pull the yarn taut. The first cross is done. Congratulations, you master the cross-stitch!
8. What happens next depends on your motif template. In our example, two rows of 5 crosses each were embroidered. You can see that the needle on the back side of the fabric was led from the last pore of the previous cross into the first pore of the next cross, and then steps 6 and 7 were repeated.

9. When you have finished embroidering your pattern or changing the yarn, remember to sew the two ends of the previous thread. Thread it into the eye of the needle, pass the needle through the embroidery pattern found on the back, and cut off the rest of the thread.

Customize embroidery projects
In haberdashery, embroidery objects are often offered as ready-made sets. They contain the embroidery base with motif template, the matching yarn in sufficient quantity and an embroidery needle. These sets are especially popular with beginners, especially since the motif with water-soluble color has already been printed on the fabric. This helps to keep track even with larger stitched images. A big disadvantage, however, is that this creativity is severely limited. The type and size of the motif and its arrangement on the embroidery base are already given. If one does not like the yarn, it can be replaced, but with additional costs.

If you want to customize your embroidery design, you can easily create your design on paper using a PC writing program or colored pencils. It is best to create your motif in different sizes. So you can try out the size of the motif on the fabric works best, and decide for yourself where exactly it should be.
Tips for quick readers:
- Create a project type and motif
- Procure materials
- Arrange motif on the embroidery base
- Stretch the embroidery base into the hoop
- Cut the yarn and divide if necessary
- Thread the yarn into the eye of the needle
- Visualize the square on the fabric
- Pierce needle from behind in fabric
- Grab the needle from the front
- Guide the needle to the top right
- Pierce needle from front to back
- Guide the needle forward on the back
- Grasp needle and tighten yarn
- Pierce the needle on the bottom right
- Sew threads and cut