Knit headband itself - the quick guide

- material
- preparation
- Instructions for the stitches
- a) Knit right edge stitch
- b) Attach left edge stitch
- c) Knit right-hand stitch
- d) Knit left stitch
- Instructions for the bead knitting pattern
- a) First row
- b) Second row
- c) Decoupling with the crochet hook
- d) Sew ends together
- e) attach highlight
Anyone who can knit has the opportunity to individually spice up their wardrobe with self-made jumpers, scarves, caps and headbands. Not only is it fun, you can also save a lot of money. Many DIY fans start to make accessories suitable for their winter clothing as early as late summer. Here's how to knit a fashionable headband in just a few hours.
Even in winter clothing modern and chic appearance: With self-knitted accessories that's no problem! Finally, knitting offers the opportunity to inexpensively manufacture scarves, hats or headbands in their own colors. But how exactly do you do it "> Material
You need:

- two knitting needles (about 8 Euro)
- Wool
- scissors
- Needle for sewing
- Crochet hook (about 5 Euro)
- Tape measure (about 3 euros)
The two knitting needles should have the same width and size. In the trade you can buy them in a double pack. Alternatively, you can also use a circular needle. In most cases, the manufacturer of the wool gives his recommendation regarding the needle size on the label. Make sure the needles are suitable for the wool.
The prices for the wool depend on several factors. Therefore, they sometimes vary very much. It is best to compare different offers in advance. If in doubt, ask in the shop.
preparation
1. Measure the head circumference with the tape measure and note the value.
2. Now think about how wide the headband should be. Hit as many stitches to achieve the desired width. To knit a pearl pattern, you should assume an even number.
3. Thread the thread around the left hand. To do this, first place it from the little finger over the back of the hand. Then guide it past the index finger clockwise around the thumb and place it between the index and middle finger. The end of the thread should be long enough to complete the complete stitch stroke.

4. Place both needles on top of each other and grasp them with your right hand. Between thumb and forefinger, the thread has formed a cross. Lead the needles through the loop from the bottom right to the side of the thumb. Then, with the needles above the point where the thread crosses, grab the thread to the left of your forefinger and pull it through the loop. Below the resulting mesh, a knot has formed. Tighten it. Repeat this process until the desired number of stitches are on the needles.

5. Carefully pull one of the needles out of the stitch chain.
Instructions for the stitches
To knit the pearl pattern, use the following steps:
a) Knit right edge stitch
1. Pass the right needle through the loop on the back of the left.
2. Grasp the thread with the right needle.
3. Pass the thread through the stitch.

b) Attach left edge stitch
1. Lay the thread forward with the left index finger in front of the last stitch.
2. Insert the last stitch behind the thread from the left to the right needle.

c) Knit right-hand stitch
1. Place the right needle under the next stitch and feed it from left to right through the stitch.
2. Pass the thread around the right needle with your left index finger.
3. Pass the thread through the loop.

d) Knit left stitch
1. Lay the thread forward with your left index finger in front of the next stitch.
2. Pass the right needle through the loop from right to left in front of the left needle.
3. Grasp the thread with the right needle.
4. Pass the thread through the loop.

Instructions for the bead knitting pattern
a) First row
1. Knit right edge stitch
2. knit one stitch to the right
3. Knit one stitch left
4. Repeat steps 2 and 3 to the last stitch
5. attach last stitch as left edge stitch
b) Second row
1. Knit off right edge stitch
2. Knit one stitch left
3. Knit one stitch to the right
4. Repeat steps 2 and 3 to the last stitch
5. attach last stitch as left edge stitch
Repeat steps a) and b) until the knitted object has reached the length of the noted circumference of the head.
c) Decoupling with the crochet hook
1. Take the crochet hook in the right hand.
2. Guide the crochet hook through the stitch.
3. Pass the thread around the crochet hook with your left index finger.
4. Grasp the hook with the hook and thread it through the needle.

5. Repeat steps 2 to 4 with the next stitch. Now there are two stitches on the crochet hook.
6. Guide the thread around the crochet hook with your left index finger.
7. Grasp the thread with the hook and pass it through both stitches.

8. Repeat steps 2 to 4 and then follow steps 6 and 7 until the knitted object is completely chained off the knitting needle.
9. Cut the thread and pull the rest completely through the last stitch.

10. Now sew all protruding threads and cut off the remains with scissors.
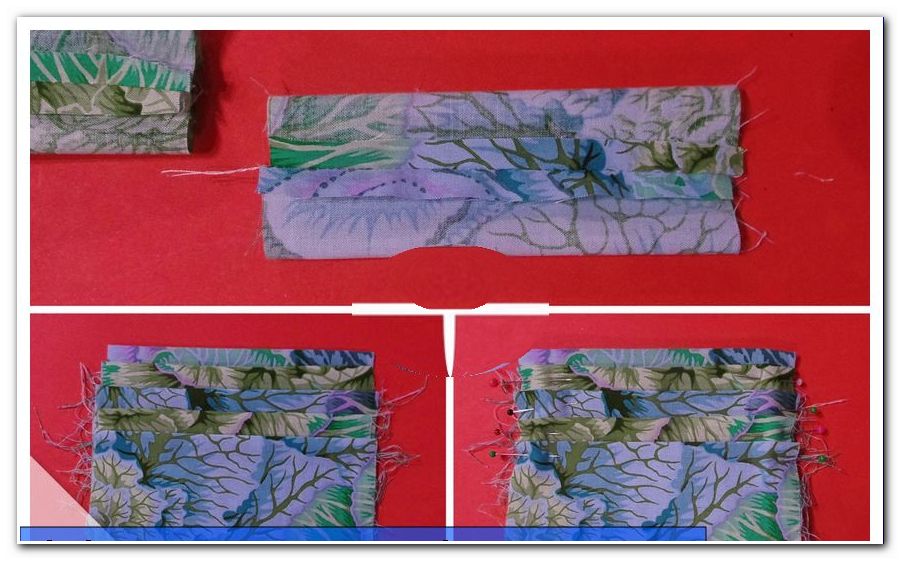
d) Sew ends together
1. Lay the two ends of the headband flush left to left.
2. Pick up a sewing needle and thread a 20 cm thread into the eye.
3. Sew the two ends of the headband together using a lockstitch. This stitch belongs to the basics of sewing - how to work the lockstitch, you can find out here: www.zhonyingli.com/mit-der-hand-naehen-lernen/
4. Sew on the thread remnants and cut them off. The headband is finished now.

e) attach highlight
After steps a) to c), make a smaller and narrower embroidery object. To highlight the highlight in color, you can use a different shade or a contrasting color. Then crumple the headband with your fingers a little at the point where the ends have been sewn together. At this point, place the smaller knit in a circle around the headband and sew the ends together after step D. Make sure the seam is on the inside of the headband so you will not see it later. Sew the remaining threads with the Vernähnähnadel and cut off the remainder with scissors.

Tips for quick readers
- Pick out suitable wool
- get the remaining materials
- Measure head circumference
- Make main part in desired dimensions
- Bind off with crochet hook
- Sew threads with vernier needle
- Cut off remnants of the threads with scissors
- Sew ends together with the lockstitch
- Make a highlight
- Lay the highlight in a circle around the headband
- Sew on the highlight with lockstitch